
Quick Start
Welcome to Epiphany! This guide will help you get up and running in just a few minutes.
1. Opening the GUI
Once in game, press the K key by default to open the Build System GUI.
If there's a keybind conflict, go to Options → Controls → Key Binds → Epiphany and rebind "Open Epiphany GUI".
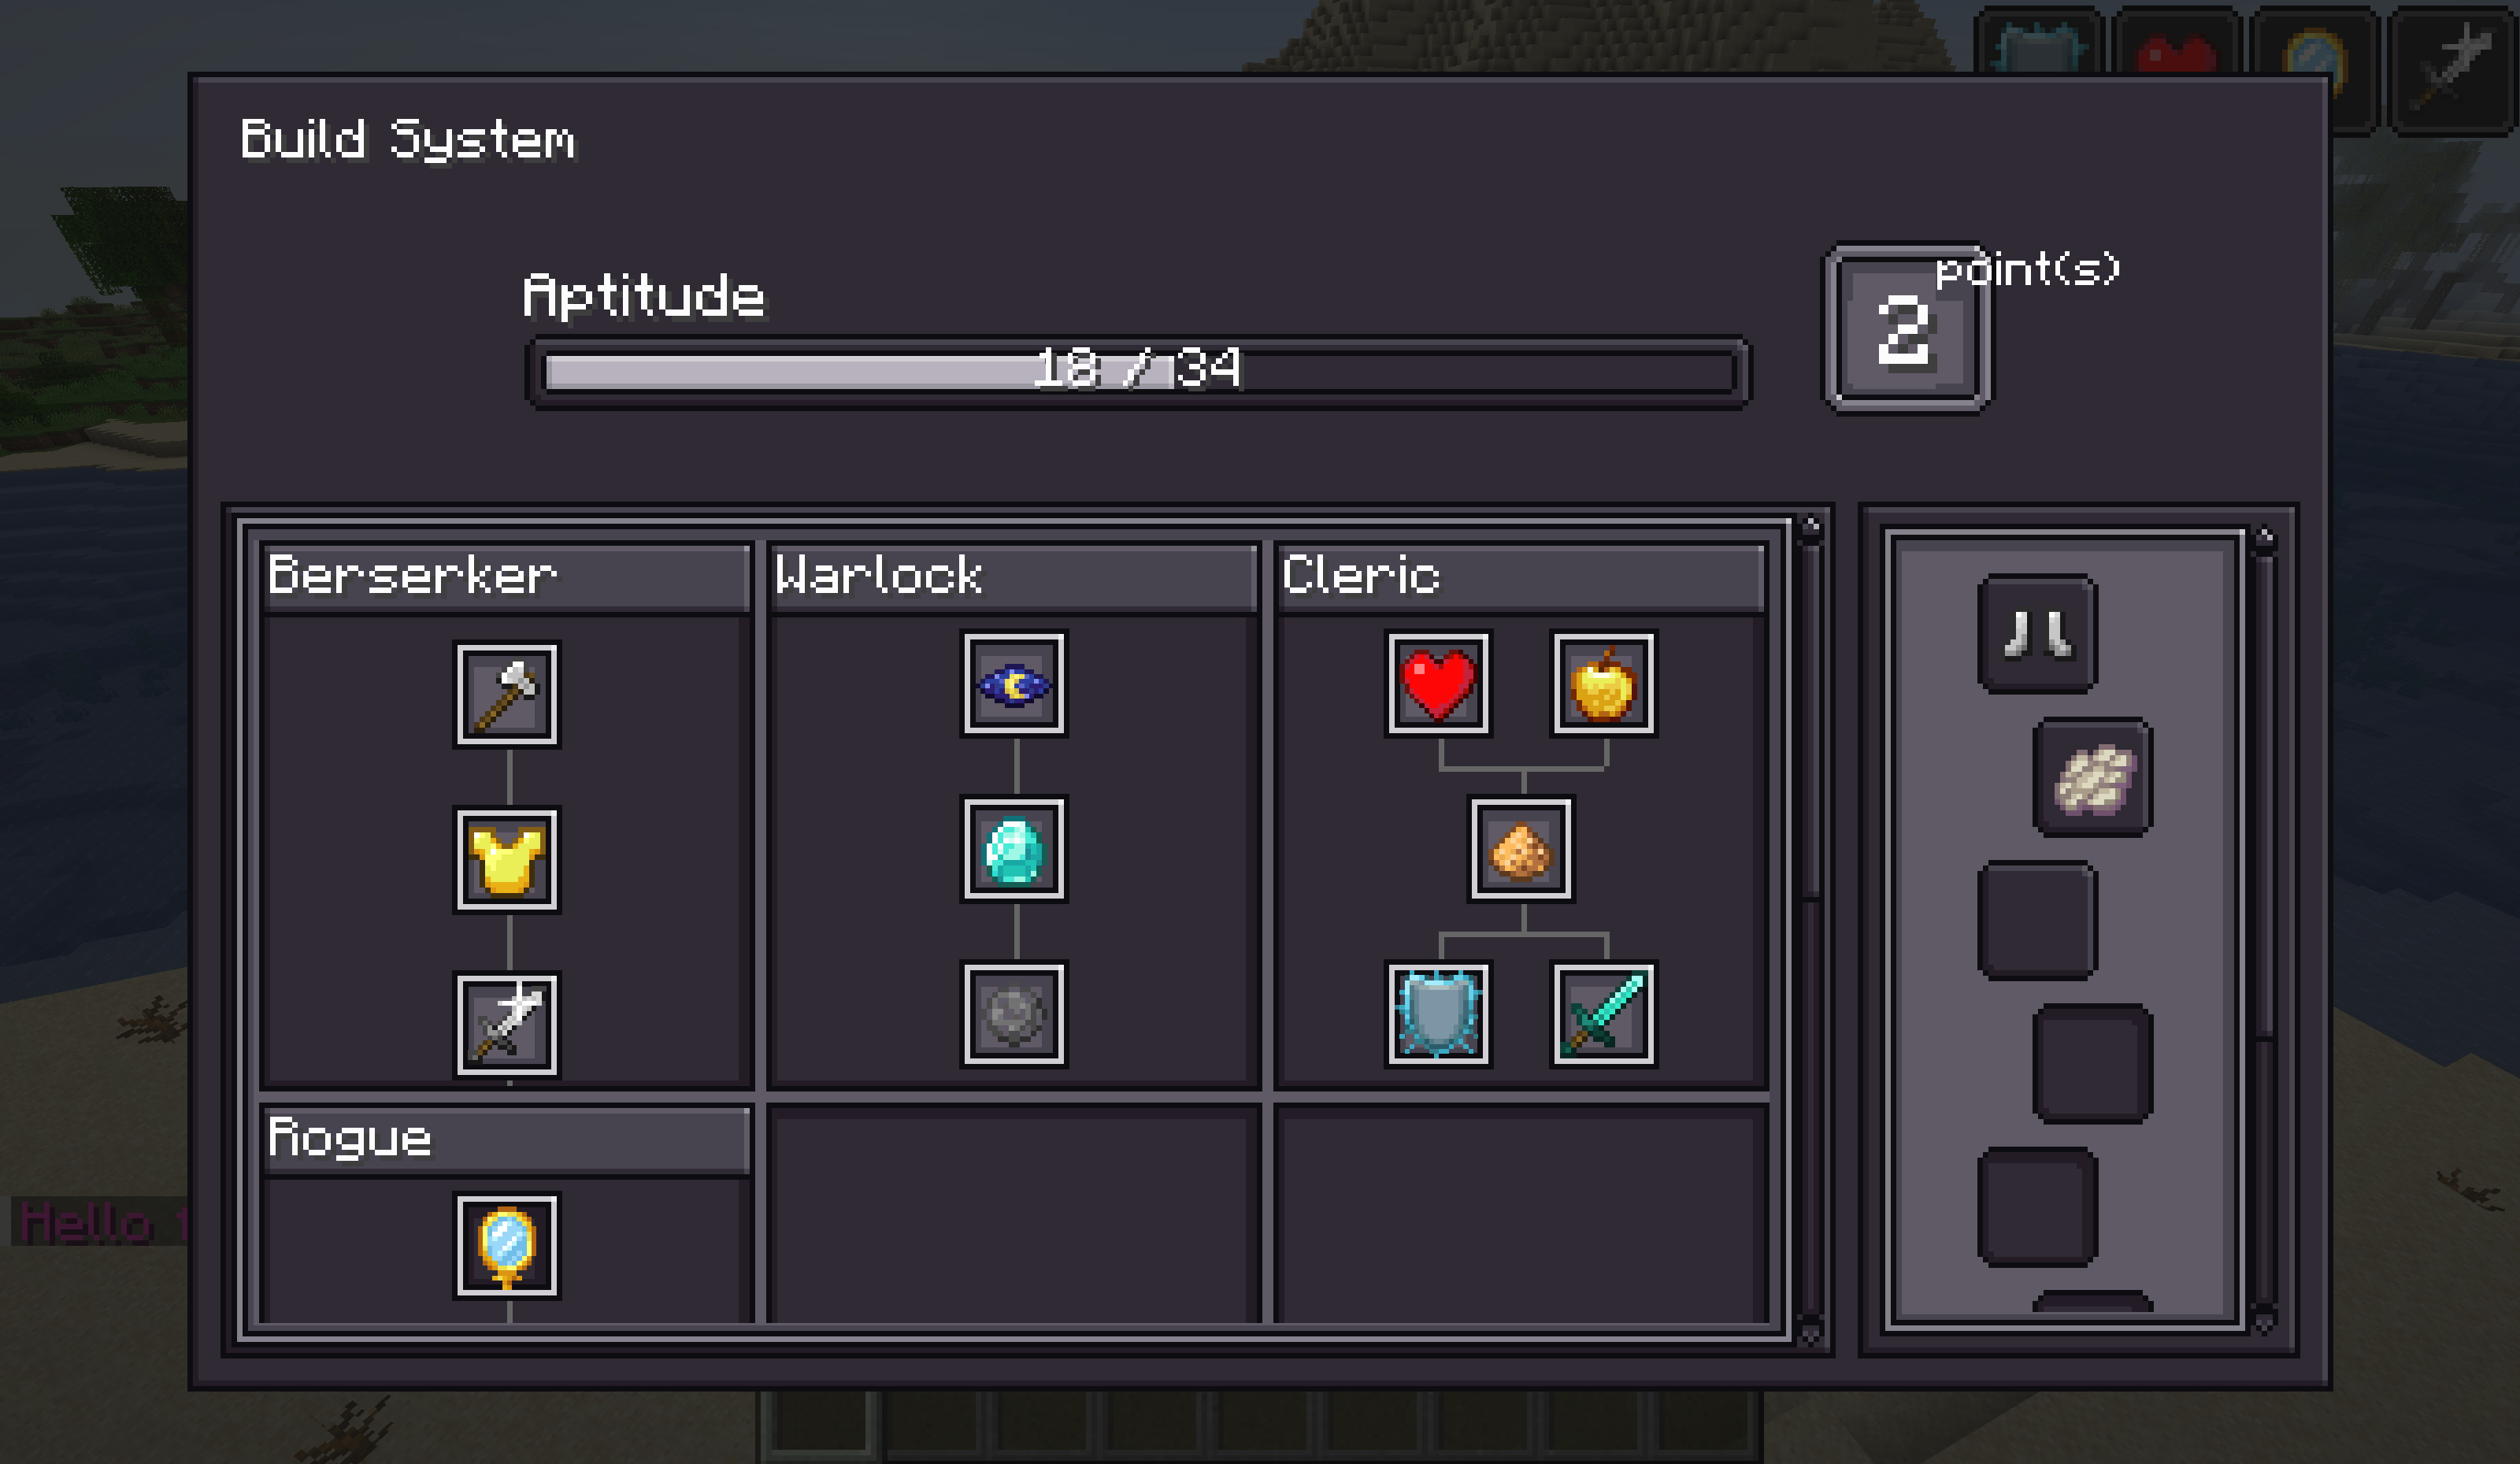
The interface is divided top-to-bottom into the Top Status Bar and the Main Content Area. The main area is split left and right into the Module Area and the Epiphany Area.
1.1 Top Status Bar
| Element | Description |
|---|---|
| Aptitude Progress Bar | Shows your current aptitude versus the amount needed for the next level (e.g., 3 / 10). When full, you automatically gain 1 Insight Point and aptitude resets to zero. |
| Insight Point Badge | Displays your current available (unspent) Insight Points. |
1.2 Module Area (Left Main Area)
The module area is a scrollable grid displaying the modules you've currently selected. Each module card contains:
- Module Name (top title bar)
- Insight Tree (main body) — you can view and interact with the module's insight nodes directly within the card
- Hovering over the module title bar shows the module description and reward details (tooltip)
When you haven't filled all your module slots, the remaining grid spaces show empty slots, each with a "Select" button:
- Sufficient Insight Points → button is clickable, opens the Module Selection popup
- Insufficient Insight Points → button is greyed out
1.3 Epiphany Area (Right Narrow Column)
The epiphany area is a zigzag staggered slot column showing your epiphany slot status:
| Slot Style | Meaning |
|---|---|
| Highlighted + icon | Active epiphany (hover for details) |
| Highlighted, empty | Free epiphany slot → click to open the Epiphany Selection popup |
| Dimmed, empty | No free slots — not clickable (hover shows "No available slots") |
Total slots = maxEpiphanySlots config value; available free slots = completed modules — activated epiphanies.
2. Step-by-Step Workflow
Step 1: Accumulate Aptitude & Insight Points
Aptitude sources are entirely determined by the modpack's datapack (mining, slaying mobs, entering biomes, earning advancements, etc.). When you gain aptitude, the top progress bar fills up.
When the bar is full, the system automatically:
- Grants +1 Insight Point (badge number increases)
- Resets aptitude to zero, starting the next cycle
- Increases the aptitude required for the next point (see Mechanics for the formula)
TIP
If your aptitude bar never moves, the modpack hasn't defined aptitude rewards for your current activity — try interacting with different game content or check the modpack guide.
Step 2: Select Your First Module
- When Insight Points ≥ 1, the "Select" button on empty module slots becomes clickable.
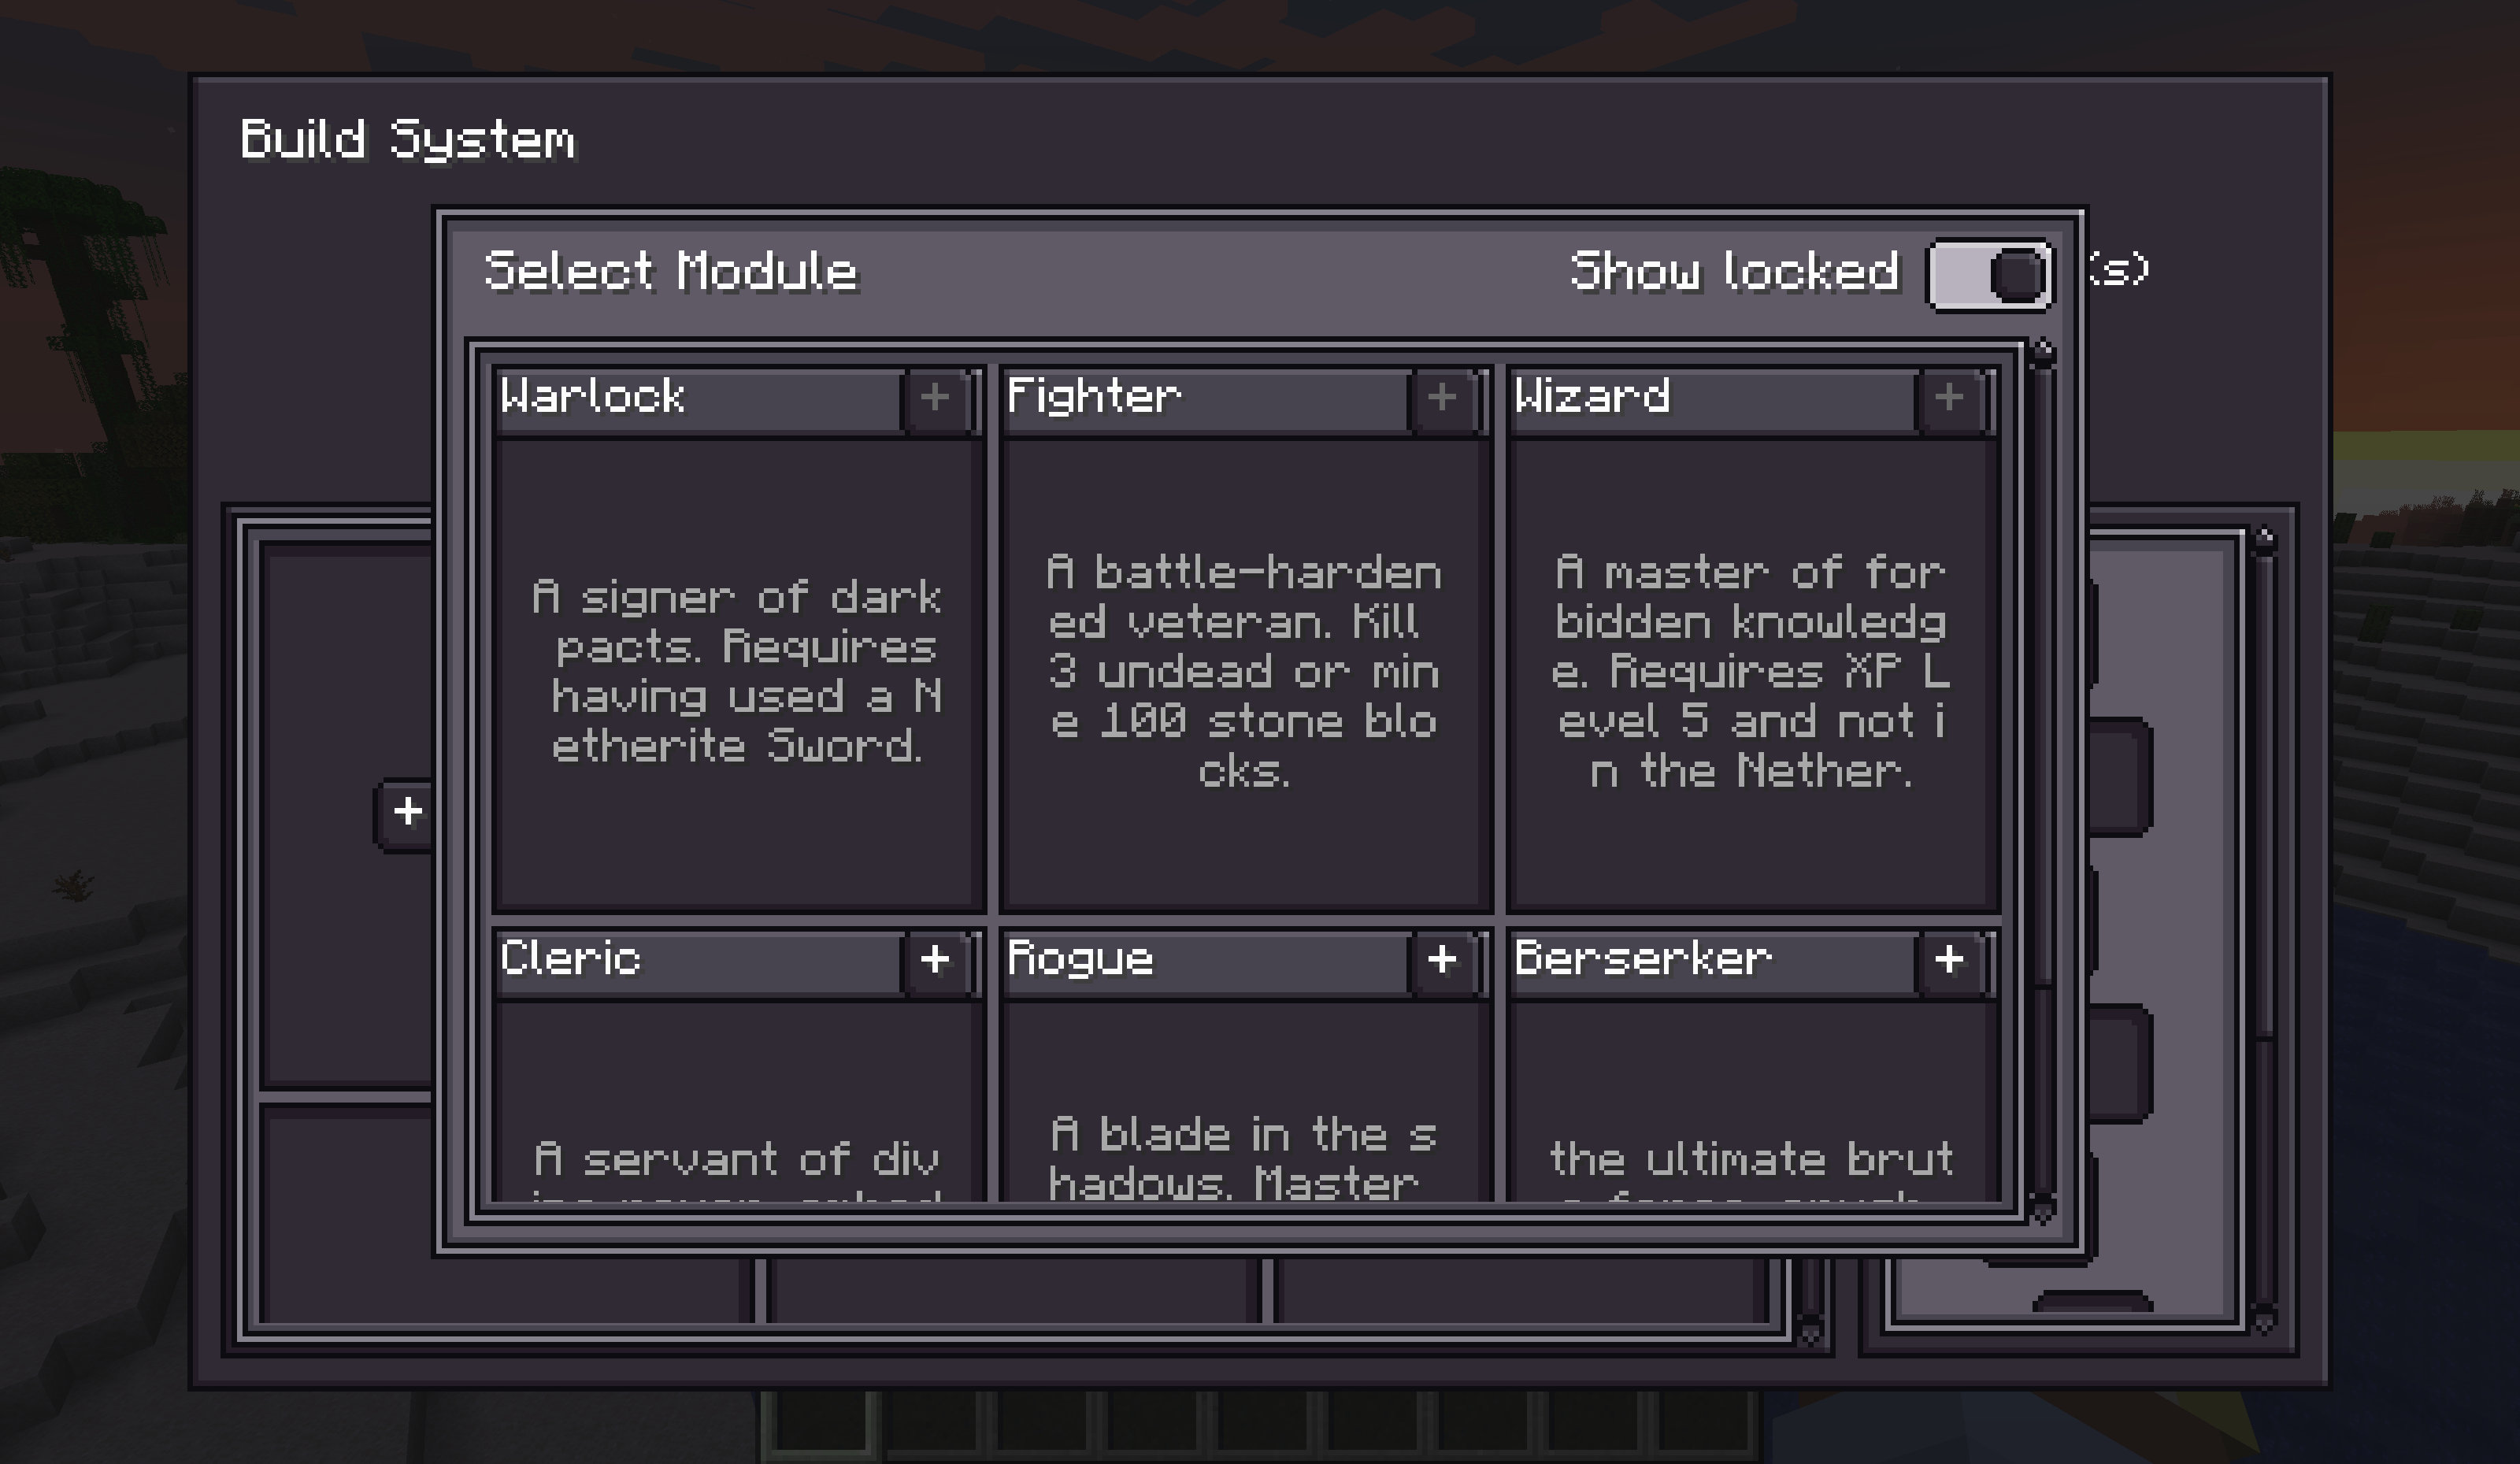
- Click the button — the Module Selection popup opens.
- The popup displays all currently available modules, sorted by weight. Each card includes:
- Module name + "Select" button
- Module description
- Hovering over the card body switches the display to a preview of the insight tree
- Hovering over the "Select" button shows: reward description (hold Shift for the full text), and unlock conditions (if unavailable)
- A "Show Locked Modules" toggle sits in the top-right corner. Enable it to additionally display currently locked modules (greyed out, not clickable), letting you preview future unlocks.
- Click "Select" on your desired module:
- Consumes
moduleSelectCostInsight Points (default 1) - Closes the popup
- The module card appears in the module area with its insight tree expanded
- Consumes
INFO
Module selection cannot be undone by the player. To reselect, you must use /epiphany module reset or /epiphany reset select.
Step 3: Unlock Insights
On the insight tree inside a selected module card:
- Insights are arranged top-to-bottom by depth (layer depth)
- Insights at the same depth are in an AND relationship: you must unlock all of them before the next layer becomes available
- Unlockable insight nodes are highlighted — click to unlock (costs the insight's
costin Insight Points, default 1) - Nodes have three visual styles to distinguish states: Unlocked / Available / Locked
- If the tree is large, you can click and drag to pan around
When all insights in a module are unlocked, the module is automatically completed:
- The completion reward is triggered
- +1 free Epiphany Slot is granted
Step 4: Choose an Epiphany
After completing a module, free slots appear in the Epiphany Area:
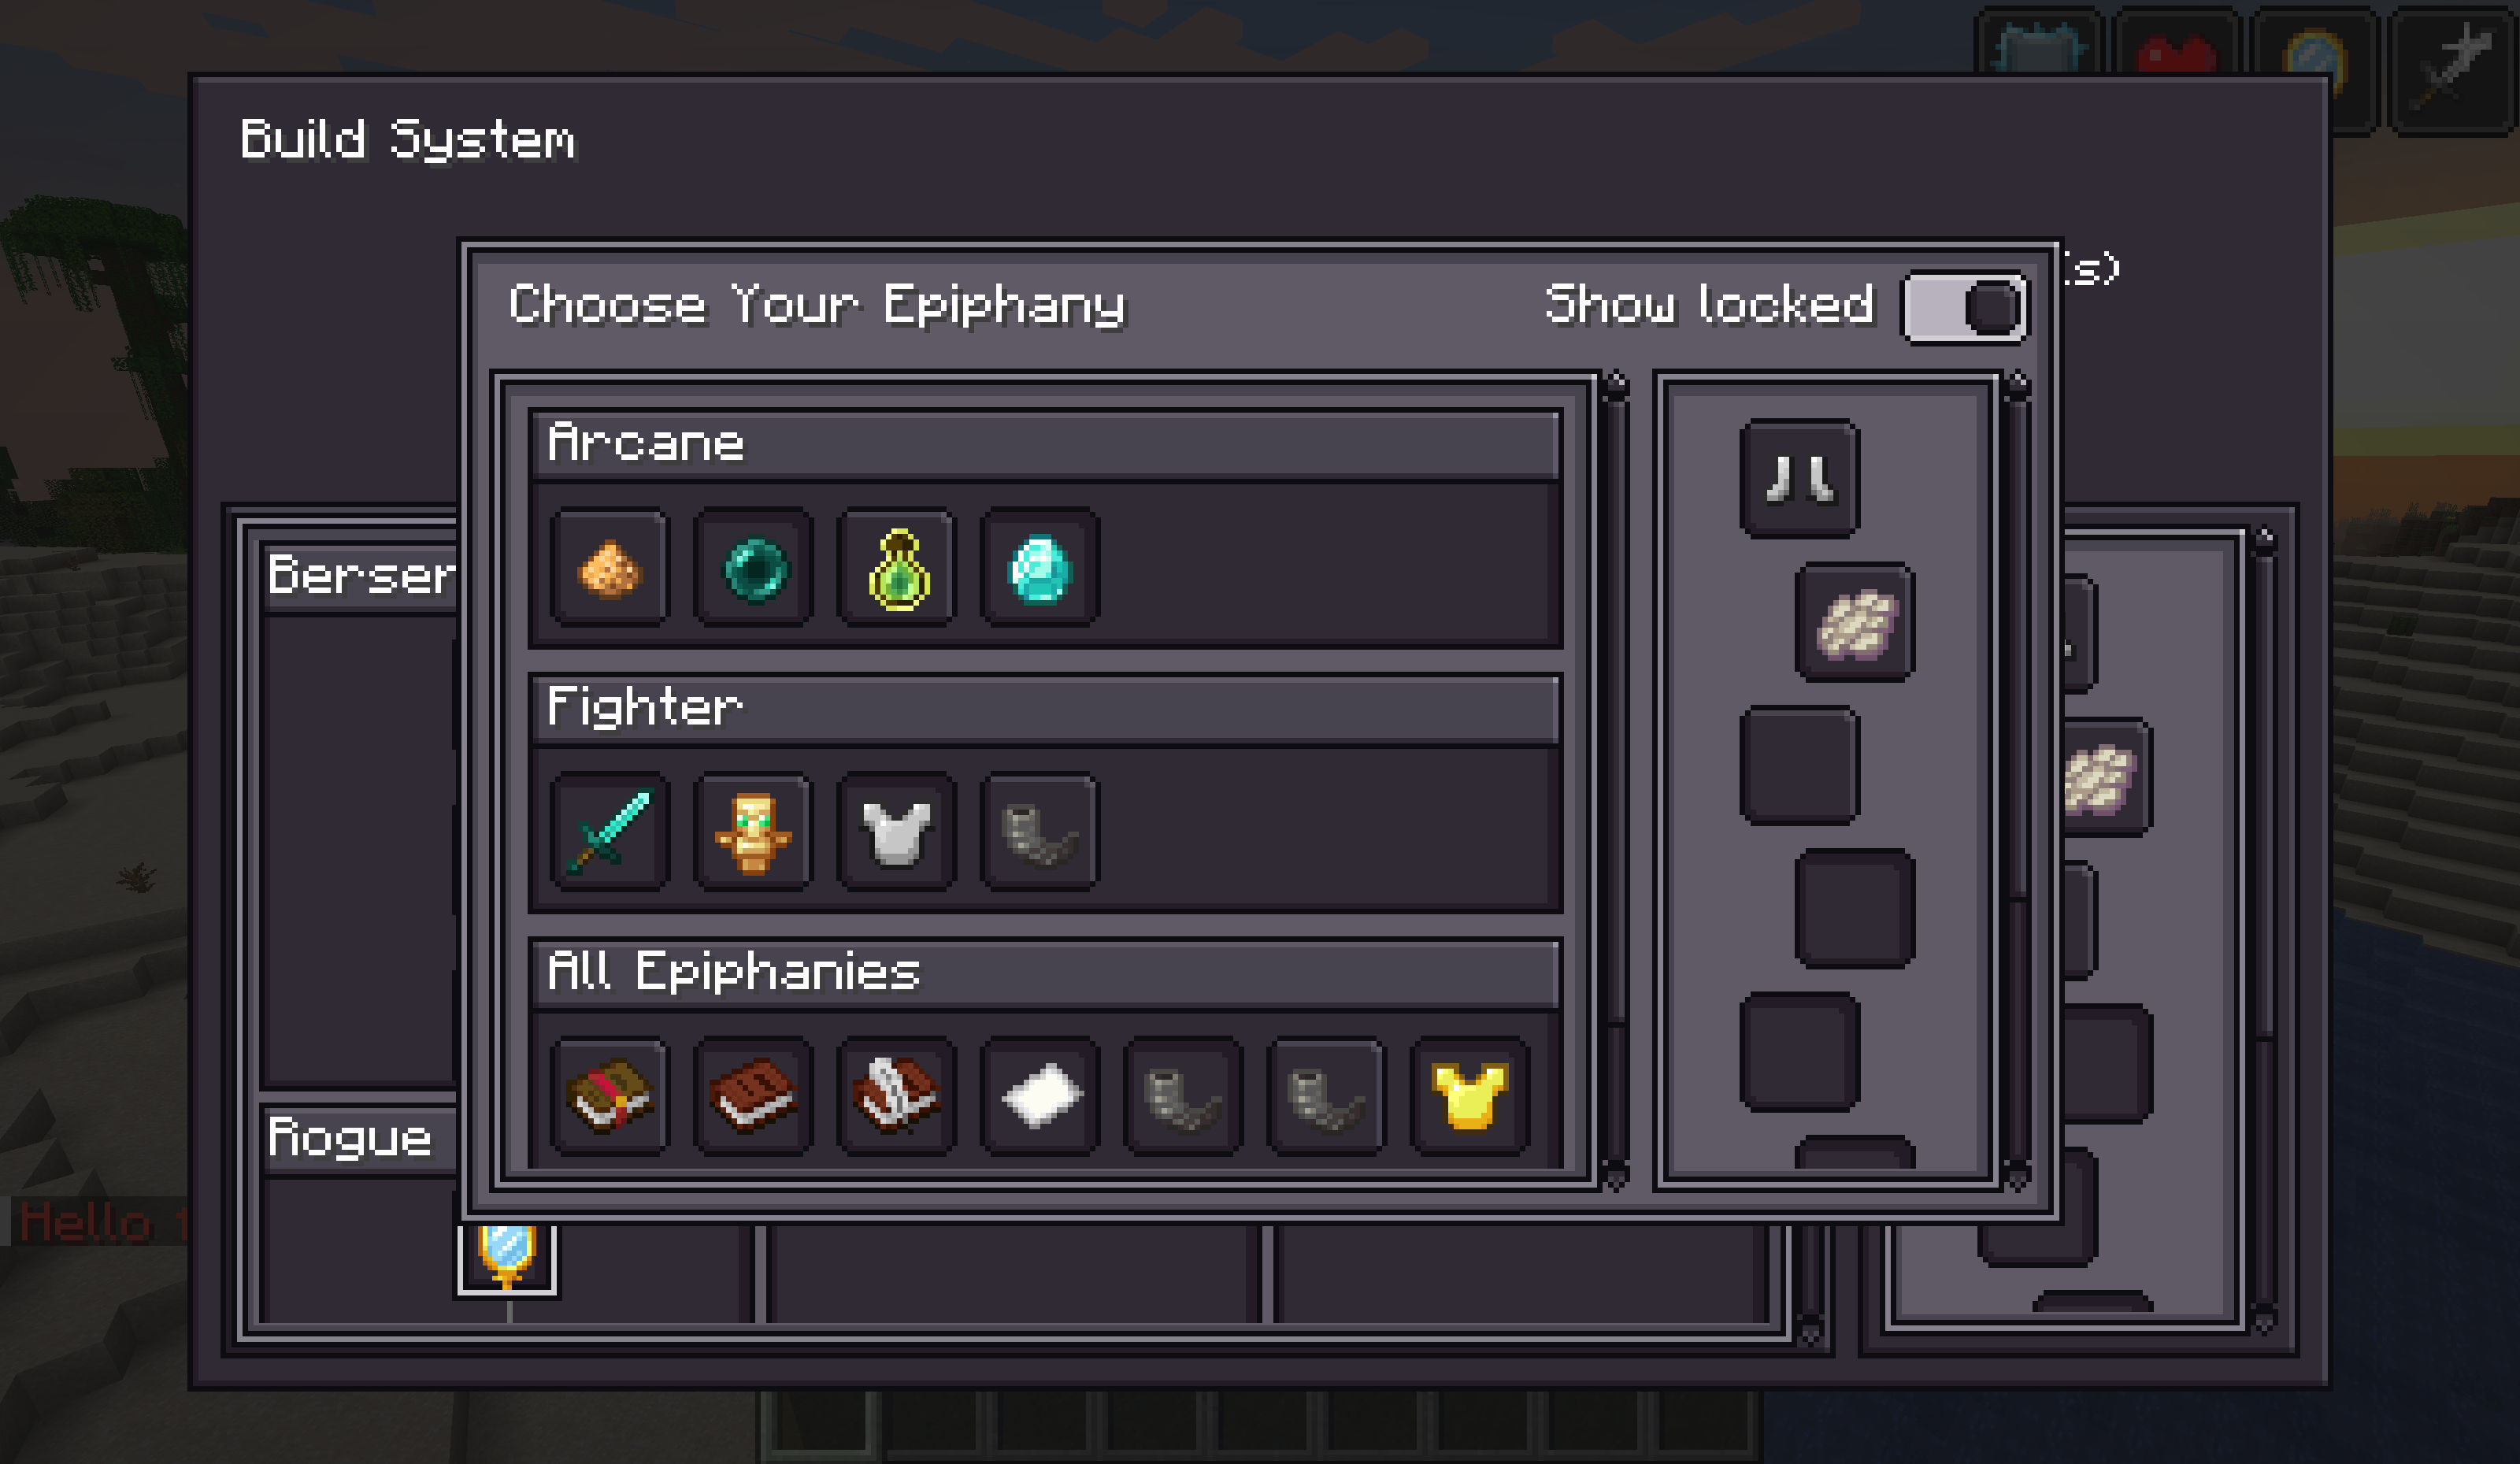
- Click a highlighted empty slot → the Epiphany Selection popup opens.
- The popup groups epiphanies by Path and lists all currently selectable ones (unlocked and not yet chosen).
- Select your desired epiphany:
- Consumes 1 free slot
- The epiphany effect takes effect immediately
- The corresponding slot now displays the epiphany's icon
TIP
For epiphany reward descriptions, hold Shift while hovering to see the full details.
WARNING
Epiphany selection cannot be undone by the player. To reselect, you must use /epiphany epiphany reset or /epiphany reset select.
3. Tooltip Tips
The entire interface makes heavy use of hover tooltips for extra information:
| Hover Target | Default | Hold Shift |
|---|---|---|
| Selected module card title bar | Name + description | Bonus: selection reward, completion reward |
| Module "Select" button in popup | Name + description | Bonus: reward description; if locked, shows unlock condition |
| Active epiphany slot | Name + description | Bonus: reward description |
Whenever you see dim grey italic text "(Hold Shift for more)", the tooltip has additional content to reveal.
4. Common Status Reference
| What You See | Meaning |
|---|---|
| Module slot "Select" button is greyed out | Insufficient Insight Points |
| Module button in popup is greyed out | Locked (condition not met) or insufficient Insight Points |
| Module not in the list at all | The module is locked and "Show Locked Modules" is unchecked |
| Epiphany slot is dimmed, tooltip says no slots | Activated epiphanies — slots provided by completed modules |
| All epiphany slots are filled, can't add more | You've reached the maxEpiphanySlots cap |
Next Steps
- Want to understand each concept deeply? → Gameplay
- Want to see all config options? —Config Reference
- Want to know all commands? —Command Reference